You can change Blend Modes
and opacity of the layer, according to
your colors.
Unzip supplies
Install the Filters in your PSP Plugins folder.
Place Selection in PSP
Selection Folder
Open all images with PSP, duplicate and minimize them and close the originals.
Never work with original images.
Save your work often in case of problems with your psp
This tutorial was translated with Corel PSPX18,
but it can also be made using other
versions of PSP.
The results might be slightly different according to the version of
PSP you use

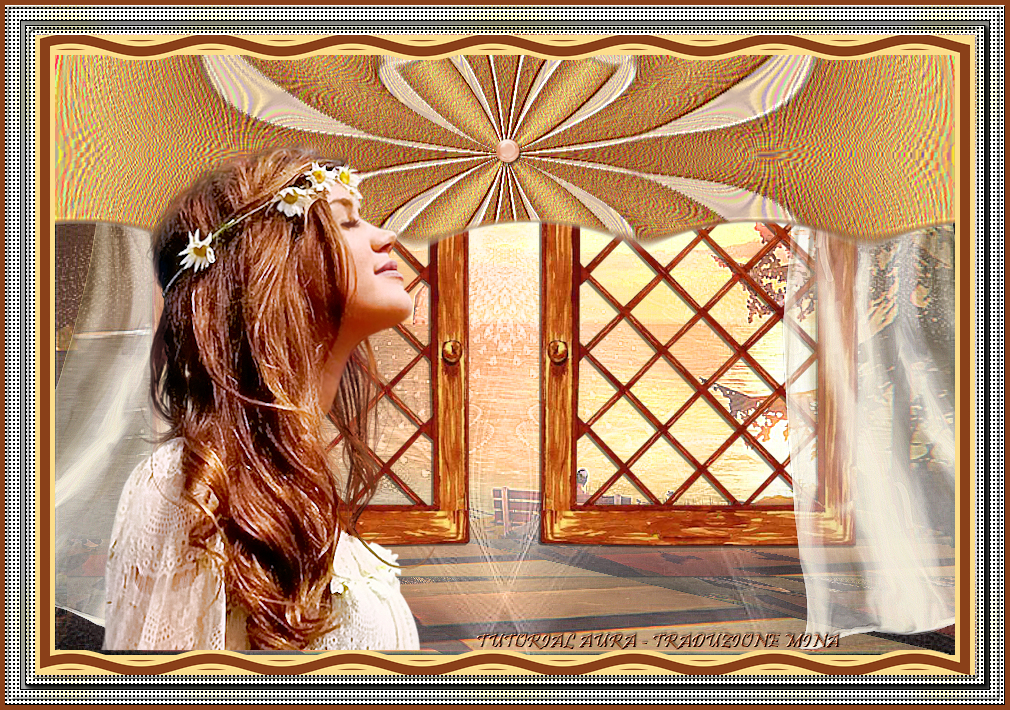
Step 1
Open a new
transparent image 900 x 600 pixels
Set your foreground color with a light color of your tube
and your background color with a dark color of your tube
Set your foreground color to a Foreground/Background
Gradient (Corel_06_029), style Rectangular:

Flood fill with Foreground Gradient.
Effects/Edge
effects/Enhance More.
Effects/Plugins/Superune Filter/Supercubic Reverse as follows:

Effects/3D Effects/Drop Shadow color black as follows:

Edit / Repeat / Drop shadow.
Step 2.
Selections/Select all.
Selections/Float.
Selections/DeFloat.
Effects/Plugins/Filters Unlimited 2.0/&<Bkg
Kaleidoscope> Kaleidoscope butterfly:
zoom 255

Effects/User Defined Filter/Emboss3.

Selections/Select None.
Step 3.
Layers/New Raster Layer.
Selections/Select All.
Maximise your background landscape.
Edit/Copy.
Go back to your work and go to Edit>Paste into selection.
Selections/Select None.
Layers/ Arrange /Move down.
Effects/Edge effects/ enhance more.
Maximise Finestra.png.
Edit/Copy.
Go back to your work and go to Edit>Paste as new layer.
Don't move.
Image/Resize 80%/resize all layer not checked.

Effects/3D Effects/Drop Shadow as before.
Step 4.
Activate the background layer.
Selections> Load /Save Selection> Load Selection from Disk.
Find and load Sunset2 selection.

Selections> Promote
selection to layer.
Effects> Plugins> Mura's Meister - Perspective Tiling.

Selections> Select none.
Effects> 3D Effects> Drop shadow - color black:

Step 5.
Change Foreground Colour to white color.
Layers> New raster layer.
Flood Fill the layer with white color.
Layers> New mask layer> From an image.
Open the drop-down menu under the source window and you will see the list of
open images.
Select the mask Narahs_mask_1047.

Effects> Edge Effects> Enhance more.
Layers> Merge> Merge group.
Image> Mirror - Mirror Vertical.
Place the mask behind the window.
Change Blend Mode to Luminance Legacy (or blend of your choice)
and reduce the opacity
to 70%.
Layers> Duplicate.
Image> Mirror - Mirror Horizontal.
Layers> Merge> Merge down.


Step 6.
Activate the window layer.
Maximise "tendina.png" (the curtain tube)
- Edit / Copy.
Go back to your work and Edit> Paste as a new layer.
Place the curtain on the left above the window
Effects> Edge Effects> Enhance.
Layers> Duplicate.
Image> Mirror - Mirror Horizontal.
If you want to animate
something, or keep the frame, proceed as below:
Window> Duplicate or on the keyboard shift + D to make a copy,
and minimize this image.
Go back to your work.
Step 7.
Image> Add borders, 5 pixels, symmetric, light color.
Image> Add borders, 10 pixels, symmetric, dark color.
Image> Add borders, 5 pixels, symmetric, light color.
Selections> Select all.
Selections> Modify> Contract - 20 pixels.
Selections> Invert.
Effects> Distortion effects> Waves.

Selections> Select None
Selections> Select all.
Image> Add borders, 30 pixels, symmetric, white color.
Selections> Invert.
Effects> Reflection effects> Kaleidoscope.

Adjust> Blur> Gaussian blur - radius 30

Effects> Texture Effects> Weave.

Adjust> Sharpness/Sharpen more.
Effects> 3D Effects> Inner bevel.

Image> Add borders, 5 pixels, symmetrical,
dark color.
Selections> Select none.
Selections> Select all.
Selections> Modify> Contract - 20 pixels.
Effects> Plugins> AAA Frames - Foto Frame.

Selections/Select None
And now you can add your tubes.
Open the small "bottoncino" button, change the color to your liking.
and position it well in the center of the "drapery".

Layers/New Raster Layer
Add your Watermark
Layers/Merge All Flatten
File/Export/JPEG Optimiser/Compression Value 20

If you want to animate or
keep the frame, proceed as below:
Activate the background layer.
Selections> Select all.
Selections> Modify> Contract - 60 pixels.
Selections> Invert.
Selections> Promote the selection to layer.
And now the frame is on a new layer.

Edit> Copy.
Maximize the image minimized with the layers open.
Activate the bottom layer Raster 2.

Image> Canvas size - 1010 x 710 pixels.

Activate the Top Layer
Edit> Paste as a new layer.
Add the tubes and the small button.
And now you have all the layers open, to animate to your liking.


I hope you have enjoyed this tutorial

MY BLOG TRANSLATION
Mina@
tubes
Mina@
tubes femminili
RITORNA ALLA PAGINA DEL BLOG