You can change Blend Modes
and opacity of the layer, according to
your colors.
Unzip supplies
Put the JC-022 texture in the PSP texture folder;
install the filters in your PSP Plugins folder.
Open all images with PSP, duplicate them and close the originals.
Never work with original images.
Save your work often in case of problems with your psp
This tutorial was translated with Corel X18,
but it can also be made using other
versions of PSP.
The results might be slightly different according to the version of
PSP you use

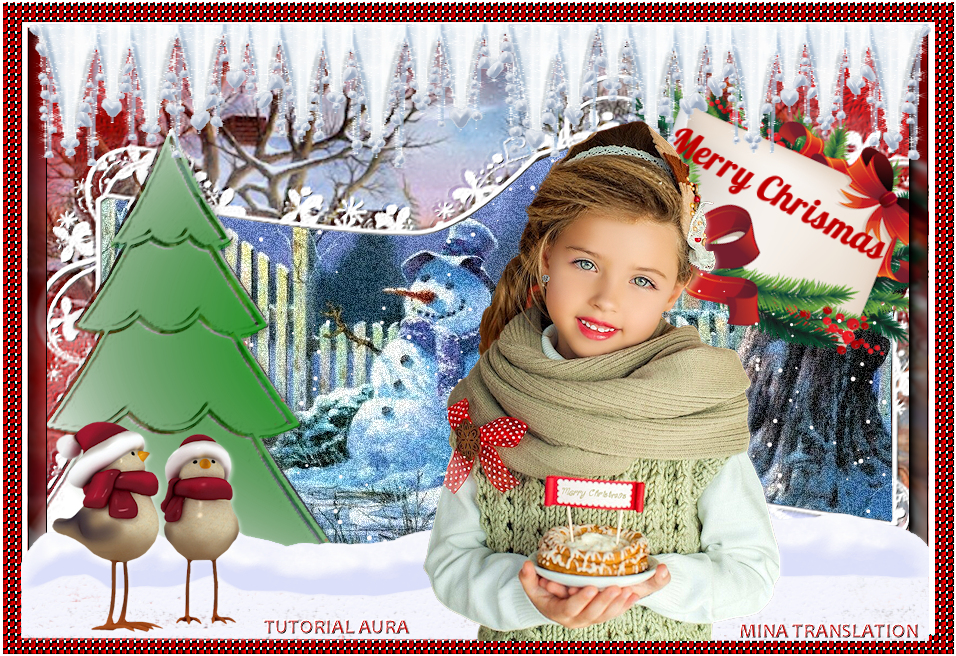
Step 1
Open a new
transparent image 900 x 600 pixels
Flood Fill with a red color of your choice.
I used #c00000
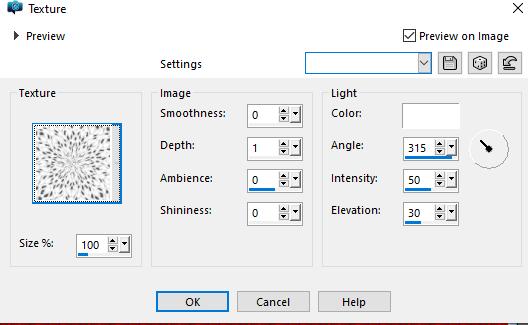
Effects/Texture effects> texture> JC_022
Open Tubes mistedNoel Tinnad
(1) -
Edit/copy
go back to your work
edit /paste as a new layer
with the Pick Tool - "K" key on the keyboard
trie to enlarge it as much as possible.
"M" key to deselect
Layers> new raster layer
Flood Fill with color white
Layers - New mask layer from image
choose BflyFlbyMask55
Layers/merge/merge group
Filter / user defined
filters /emboss 3
Then Filters /muRa's seamless / emboss and alpha / default setting
Step 2
With the Selection Tool / Point to point -

select the inside of the mask as follows:

Go below the mask
layer.
Layers / New raster layer
Open your background and paste it as a new layer.
Place it as you wish.
Selections /Modify /Invert, press delete Key
Selections/ select none
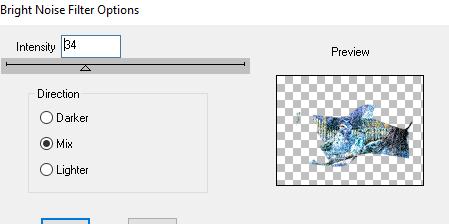
Effects /Plugins /DSB effects flux / bright noise> mix
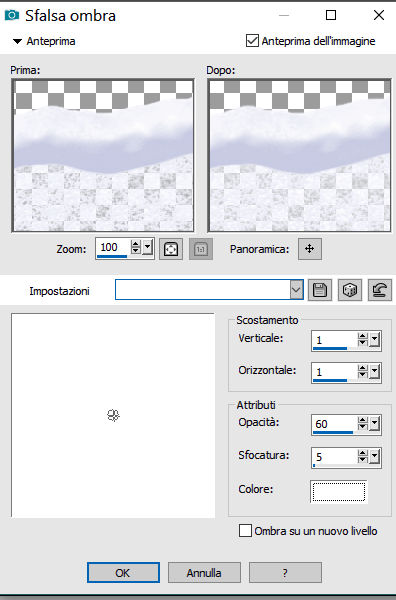
Effects / 3D effects / Drop shadow/color black
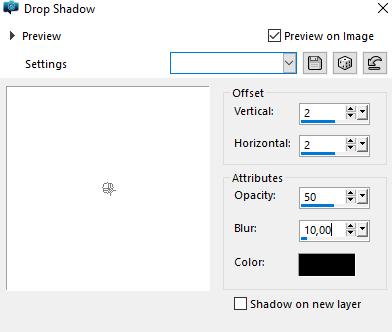
2 - 2 - 50 - 10 also in negative.
Step 3
activate the upper level - (the mask level)
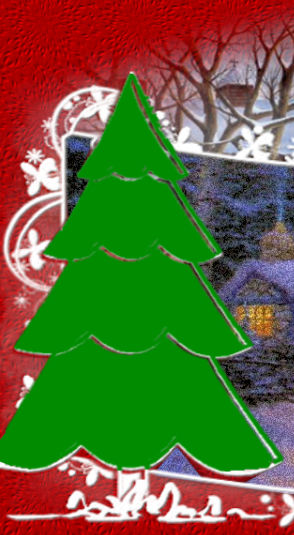
Open the tube Albero Verde
Edit / Copy
Go back to your work
Edit/ paste as new layer
overlap it with the white one as follows:
Selections/ select all /
selections/float/
selections/defloat
Layer/load-save mask/load mask from disk/mask 2020
Layers/merge/merge group
Selections/select none
Effects/3D effects/drop
shadow / color black as follows:
Repeat the drop shadow in negative.
Step 4
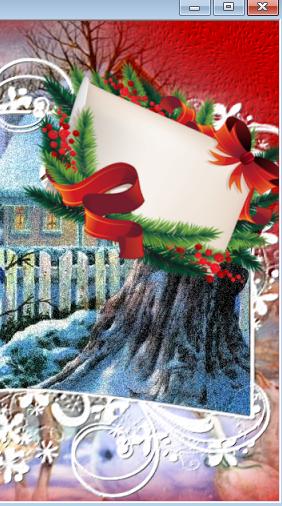
Open the tube Biglietto
Edit / Copy
Go back to your work
Edit/ paste as new layer
overwrite it on the white card
to the right as follows:
Effects/3D effects/drop
shadow
same settings as before (positive and negative)
Open Tube Ghiaccio
Edit / Copy
Go back to your work: edit/paste as new layer
place it at the top as shown in the finished image
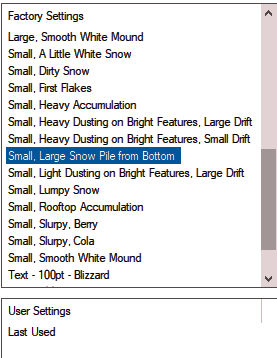
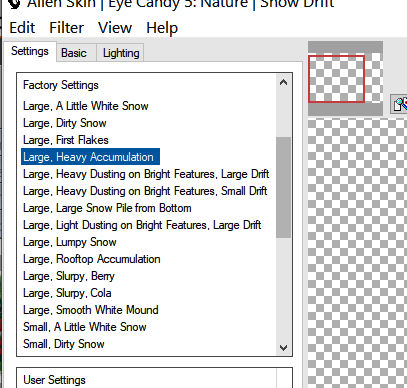
Effects/Plugins/Alien Skin Nature / snow drift as follows:
Layer/new raster layer
Activate the bottom layer (the background level)
With Freehand Selection Tool / point to point/feather 0/smoothing 0
create a shape as follows, but not necessarily the same

Layers / new raster layer
Effects/Plugins/ Alien Skin Nature snow drift
Preset Large, Heavy accumulation as follows:
Selections / select none
Layers /Duplicate 3 times
Layers/merge / merge down 3 times.
Layers/Arrange/Bring to top
Effects/3D effects/Drop shadow / color white
Place your tubes
write a word of good wishes on the ticket
Effects/3D effects / Drop shadow as you prefer
Step 5
If you want to do animation
If you want snow:
Activate the background layer under the mask Bfly

Selections / Select all, Selection float/defloat
Layers / New raster layer
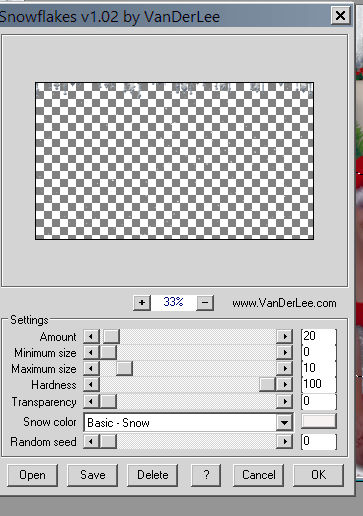
Effects / Plugins / VDL snowflakes as follows
Rename this Layer N1
Layers / New raster layer
Effects / Plugins / VDL snowflakes as follows
Change Random Seed to 5
Rename this layer N2
Layers / New raster layer
Effects / Plugins / VDL snowflakes as follows
Change Random Seed to 5
Rename this layer N2
Layers / New raster layer
Effects / Plugins / VDL snowflakes as follows
Change Random Seed to 10
Rename this layer N3
Selections/select none
Step 6
WE CREATE THE FRAME
As you know if we add a border
the tag level becomes single.
We have three levels of snow.
How can we do?
The solutions are 2:
we use canvas size or we make the frame separately.
Let's try to make the frame separately.
Step 7
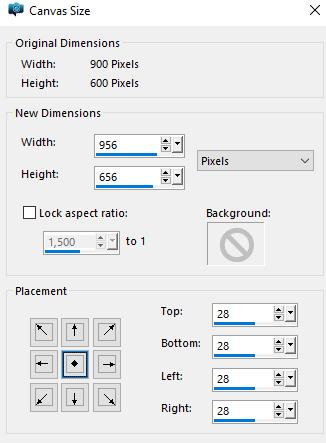
Open a new transparent image 900x600 pixels
Image add border 1 px red - symetric (my color #C00000)
Image /Add border 5 px white - symetric
Image /Add border 20 px red -symetric
Image /Add border 2 px white - symetric
Select the red border (20 px) with the magic wand (mode Add-shift/tolerance 0)
Step 8
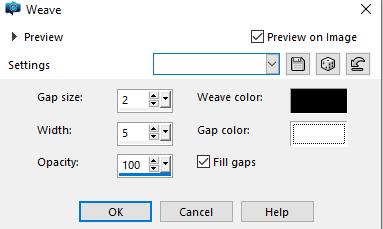
Effects/Texture effects/Weave as follows:
Effects/plugins/User defined filter/emboss 3
Selections/select none
Layers/promote background layer
with the magic wand select the white interior of the frame.
Press Delete Key
Selections/select none
The frame is completed
Now what do we do?
The solutions are 2
we import it into the PSP frames folder,
we give it a name and then we take it from : Image/Picture Frame
or
we read what is the frame size as follows:
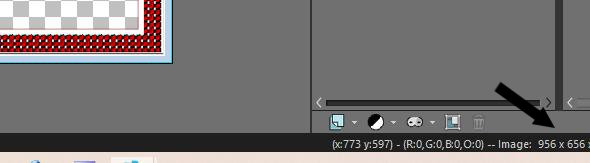
Go back to the your main work
Go to the top layer
Image/Canvas size
Layers/new raster layer
Selections/select all
Maximize your work Cornice (Frame)
Edit/copy
go back to your main work: Edit/paste into selection
Selections/select none
With the magic wand, click in the center of the frame level to select it.

New raster layer
Effects /3D effects /cutout

Close the snow levels, the
tubes and N1, N2, N3
Layers /merge/ merge visible.
Place the merged layer to the bottom.
Selections/select all
Selections/Modify/contract 28 px
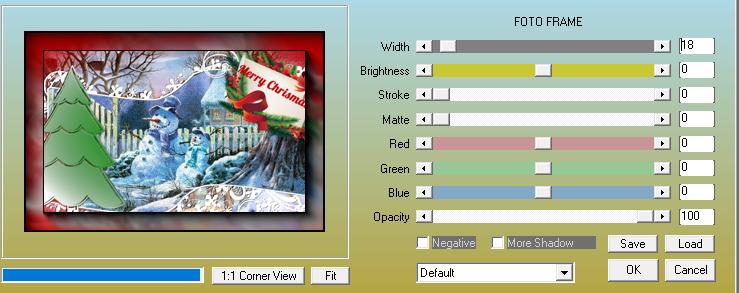
Effects/Plugins/AAA FRAME /foto frame as follows:
Selections/select none
Sign your work or add your watermark to a new level
If you don't want to
do the animation:
File / export / JPEG optimization
***
Step 9
let's go to Animation Shop
Open the tubes you closed
earlier
Open N1 (N 2 and 3 are still closed)
Edit> copy special/copy merged
Open AS and paste as a new animation
Go Back to PSP, close N 1 and open N 2
Edit> copy special/copy merged
Go back to AS and paste after the current frame
Go Back to PSP, close N 2 and open N 3
Edit> copy special/copy merged
Go back to AS and paste after the current frame
In AS : Select all put as speed 20 and save as gif
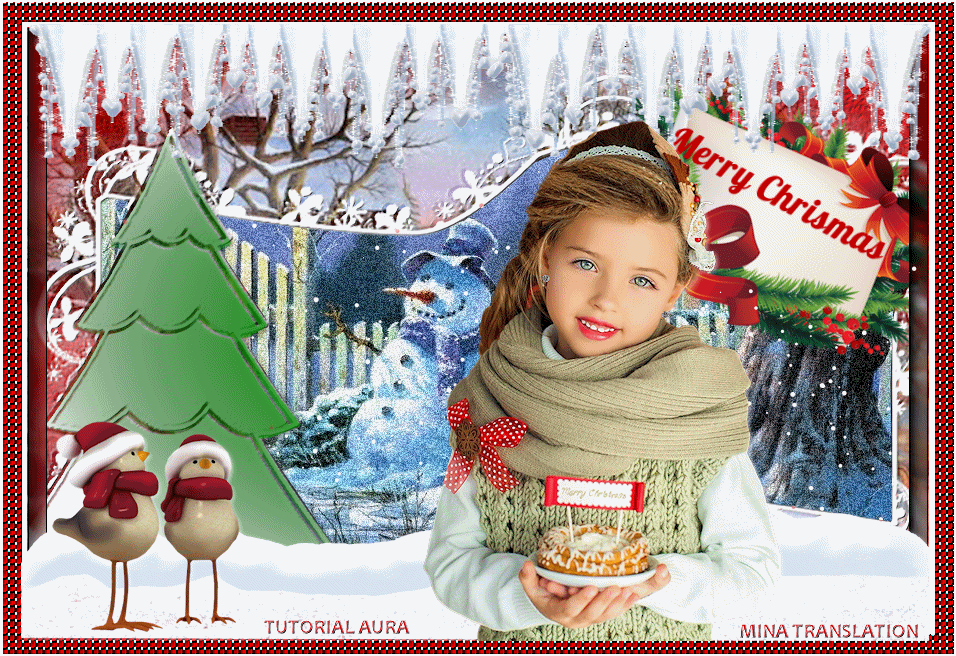
ANIMATED VERSION
I hope you enjoyed it
if you ran the tutorial, send an email to Aura.
She will insert it in the Works Gallery

MY BLOG TRANSLATION
tubes
tubes femminili
RITORNA ALLA PAGINA DEL BLOG